
Technique 2 - Small-bore Seldinger chest drain insertion
- Ensure full aseptic conditions are maintained at all times
- Perform surgical hand wash, don apron and sterile gloves
- Open pack keeping contents sterile, take additional equipment from assistant in a sterile fashion
- Clean the skin using Antiseptic skin preparation such as Chlorhexidine
- Apply sterile drape
- Make a small incision (3-5 mm) in the skin where the drain is to be inserted
- Using the needle and syringe in the pack gently insert (avoiding excess force) towards the upper border of the chosen rib aspirating continuously until air in the syringe confirms the position of the needle in the pleural cavity
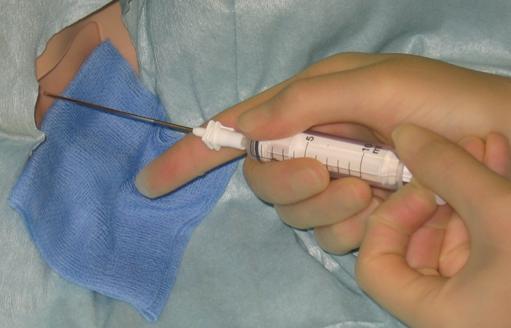 [D]
[D]Figure 13. Needle insertion while aspirating
Best Practice Statement
Air or fluid must be aspirated before wire is inserted (stop and get help or arrange USS guidance if you cannot achieve this). Both the needle and dilator should be inserted without force
Rationale: Confirm correct position and minimise risk of damage to underlying structures
Source of Evidence: BTS guidelines and NPSA
- Hold the needle steady and remove the syringe. Feed the wire gently through the needle into the pleural cavity (AT ANY STAGE IN THE PROCEDURE ONE HAND SHOULD ALWAYS BE HOLDING THE WIRE)
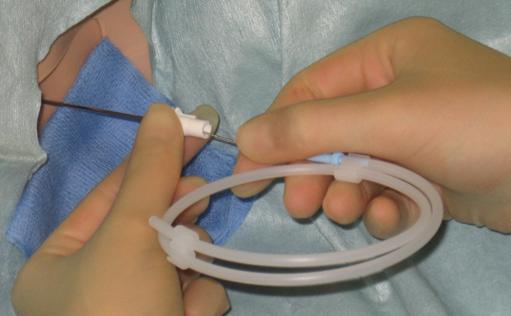 [D]
[D]Figure 14. Insertion of guide wire
- Remove the needle leaving the guide-wire in place, make sure that the wire does not shear. Feed the first dilator down over the wire and into the pleural cavity. It may be necessary to make the incision a few mm bigger. Repeat the process for the second dilator if present. Note: the dilator only needs to be inserted to a depth that is sufficient for the chest wall to be dilated. Over insertion of the dilator risks damage to thoracic structures and has been identified by NPSA as a significant cause of morbidity with the Seldinger technique.
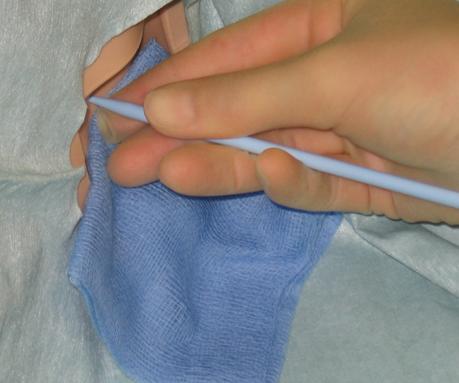 [D]
[D]Figure 15. Dilator insertion
- Remove the dilator leaving the wire in place. Estimate the depth of insertion on the scale on the drain from the apex to the skin.
- Feed the 12F chest drain over the wire until it is in the pleural cavity to desired depth
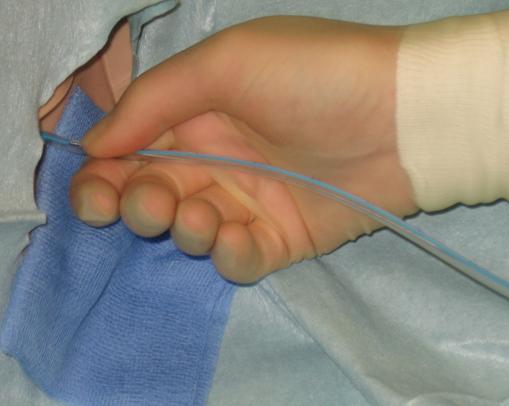 [D]
[D]Figure 16. Feed drain over wire
- Remove the wire making sure that the chest drain stays in position DO NOT LET GO OF THE DRAIN NOW
- Attach the end of the drain onto the underwater seal system and make sure that the chest drain bottle is placed below the patient
Click here for an image of the chest drain being attached to tubing
- Check that the water in the chest drain is bubbling or swinging, if in doubt ask the patient to cough gently
- An adhesive dry dressing such as MEPORE is normally all that is required to secure the drain to the skin
- Remove the drape
- Dispose of all waste and sharps appropriately
- Obtain an urgent chest-x-ray to confirm position and document findings yourself
- Check routine observations post drain insertion, and record, start a chart for recording chest drain activity
- Record procedure details, including any complications and results of chest x-ray in the patient's notes
1 |
Why must air or fluid be aspirated from the pleural cavity before the guide wire?Please tick all that apply |